How to Start bell peppers indoors
. Before you plant your bell pepper seeds, soak them overnight in warm water to give them a head start. I have grown seeds with and without soaking, and I found the ones i soaked did a better job of sprouting. So i pop the seeds in a glass with warm water overnight, and then plant in the morning. I recommend soaking seeds overnight in warm water .
The seeds require moisture and warmth to break their dormancy and sprout. Dormancy is the seeds built-in survival mechanism which prevents seeds from germinating in cold conditions which would kill the young seedlings. Just be aware that the germination process can be slow and irregular as the degree of dormancy varies considerably between species.
. Fill a disposable plastic seedling tray with good quality of soil.
. Sow your seeds indoors 1 cm (½”) deep and keep the soil as warm as possible: 27°C (80°F) is best. Cover the seeds with soil, then gently press it down to make sure the seeds come in contact with the soil. Don’t compact the soil though, just gently press it down.
. If the soil is not already wet, then you should add water. It’s best to water from the bottom so you don’t disturb the seeds. Don’t over-water the pepper seeds, as this can cause them to rot or cause damping off.
. Cover the plastic tray. The purpose of covering is to keep the moisture in the starter soil from evaporating.
. Place the seed tray in a warm location.
. Bell pepper seeds sprout in 8-21 days depending on soil temperature, you need to be patient.
. If the seeds are taking much time, then it may be too cold. To germinate them faster, you can use a heat mat. Then you will see how much faster they germinate!
. Once the first seeds start to sprout you’ll want to remove the plastic dome, as this can retain too much moisture in the soil and plant environment . After removing the plastic dome, continue to water the seedlings when the soil is dry to the touch.
. Make sure the seedlings have enough sunlight and they are getting between 14-16 hours of light every day and keep the seedlings under a well-lit window all day.
The first leaves that sprouted from the seed are the cotyledons (an embryonic leaf in seed-bearing plants, the first leaves to appear from a germinating seed.)
. The next set of leaves the seedling will develop are called "true leaves".
Try to keep your seedlings at 18-24°C (64-75°F) in the day, and 16-18°C (61-64°F) at night.
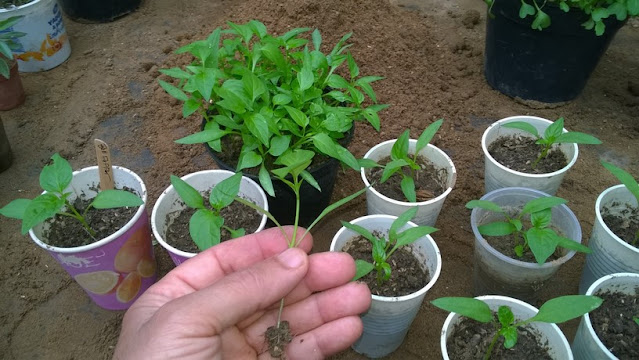
In about 2 weeks, when the first true leaves begin to form, carefully separate the seedlings and transplant each strong and healthy seedling into larger cups once they are about 3″ with their first set of true leaves.
. Once your pepper seedlings start to grow their true leaves, it’s time to start fertilizing them, but you don’t want to feed the seedlings a full dose of fertilizer. It’s best to start with a small dose at first, and slowly increase the strength of the fertilizer as your pepper seedlings grow larger. I recommend using a natural, organic fertilizer rather than chemicals!
. Once the seedlings have been transplanted to the pots, grow them at 70°F/21°C days, 60°F/16°C nights. Use a well-drained growing medium in the pots.
Caring For Bell Pepper Seedlings
. As your bell pepper seedlings grow, keep an eye out for downy mildew, aphids, white fly and other pests that can be problematic for your fragil plants. Before watering again wait until the soil is dry and water once or twice a week with an organic fertilizer solution.
Move the seedlings to a sunny southern window until you can transplant them into the garden. Don't set out your pepper transplants until night temperatures average around 55-60 degrees F. Once you have healthy bell pepper seedlings you're ready for the transplant and growing stage.
In about 2 weeks, when the first true leaves begin to form, carefully separate the seedlings and transplant each strong and healthy seedling into larger cups once they are about 3″ with their first set of true leaves.
Now that you’ve learned all the tips for starting successfully bell peppers indoors, go out there, and start your own vegetable garden!
Happy Organic Gardening!
Affiliate Disclosure
This site is a participant in the Amazon Services LLC Associates Program, an affiliate advertising program designed to provide a means for sites to earn advertising fees by advertising and linking to Amazon.com. Pages on this site may include affiliate links to Amazon.com and its affiliate sites, on which the owner of this website will make a referral commission.


